

It seems like every week I hear that another friend is starting a garden, which makes my little farming heart so happy! I think gardens are just the best for enjoying delicious, fresh food and having hard work pay off in full. A lot of folks get overwhelmed when starting out their veggie gardens and I can understand that completely -- at the beginning I hardly knew where to start.
There's so much information out there, but you don't need to know everything up front. I'm a huge proponent of diving in headfirst when it comes to gardening. It truly helps to have the mindset that every year is a learning year. You'll never have a perfect garden where everything will grow just the way you want it to. To me, that's part of the excitement of gardening -- you're constantly learning and you have the privilege of growing with your garden.
With everyone getting in gear for their summer gardens, I thought I'd throw out a few basics of gardening. These are the essentials you need to know for your beginning years. Beyond that, don't stress too much about acquiring knowledge, just enjoy the journey and dig your hands down in that dirt.

Step #1: Get your soil pH tested
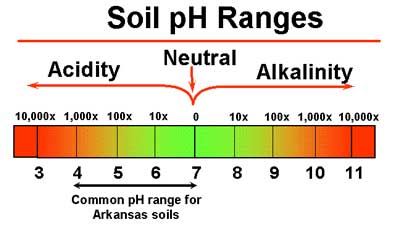
When beginning your garden it is essential to know what you're dealing with when it comes to your soil. This is a step that many people skip, but it can potentially be the #1 reason your garden may fail. Soils range from 3-11, with 3 being the most acidic and 11 being the most alkaline. Most vegetable plants like neutral soil (in the 6.5-7 range), but there's a pretty wide variety of pH preferences. Blueberries love highly acidic soil, so do hydrangeas and azaleas. Some plants are more tolerant of pH levels, but with others there are multiple issues that can arise. Having the right level for your plants will help them thrive.
The best way to get your soil tested is to send a sample to your local extension service. They will test not only the pH level but also mineral and nutrient levels, like phosphorous and potassium. You can let them know a few of the vegetables that you will be growing and they'll offer recommendations for any amendments needed to help your plants grow best.
If you've got a small garden spot, you'll only need one sample. If you've got a bit more space and different locations that you'll be using for plants (i.e. front and back yards), go ahead and get those separate areas tested.
Once you get your soil test back, it's easy to amend any variations in pH. Agricultural lime will help make your soil less acidic and more alkaline. Ammonium or iron sulfate can acidify your soil if that's what your garden needs. Both of these are available at most garden centers. The extension soil test will let you know how much will need to be applied to get the desired pH.
In our garden this year, our soil test showed that the pH level in our garden is around 5.5, which is fairly acidic. We applied lime to our main garden, where most of the alkaline-preferring veggies will be, and a bit of ammonium sulfate to the area where we planted blueberries and potatoes, both of which like acidic soils.
If you are adding any sort of amendments to your soil (lime, compost, manure, etc.) it's a good idea to get it tested yearly to see what changes have happened over the course of the growing season.

If you live in Alabama you can send your soil sample to Auburn University.
If you live in Tennessee, here's the info you need for getting your soil tested.
If you live in other states, simply search for "soil test" + "your state name" + "extension service" and you should find the information you need.
You can also test your soil pH at home with one of these, though you'll get a lot more bang for your buck with the extension service testing that provides additional analysis.
No comments:
Post a Comment